 Stained glass window-making is an art form that goes back well over 1,000 years.
Have you ever gawped up at a stained glass window with the sunlight streaming through and wondered ‘how on earth did they make that?’?
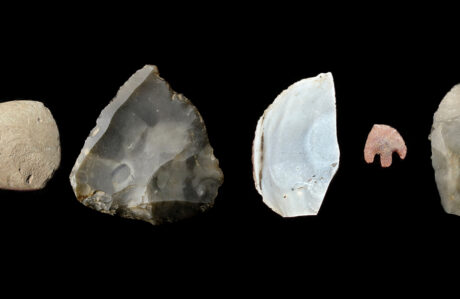
Around the world, people have been using stained glass to augment religious buildings, palaces and other halls of power for over a thousand years. In Britain, the earliest evidence comes from the monasteries at Monkwearmouth and Jarrow, where archaeologists have found hundreds of pieces of coloured glass and lead, dating back to the late 7th century.
Part art, part engineering, a stained glass window must resist wind, rain and the urge to collapse under its own weight (particularly a problem for larger windows), all while looking amazing.
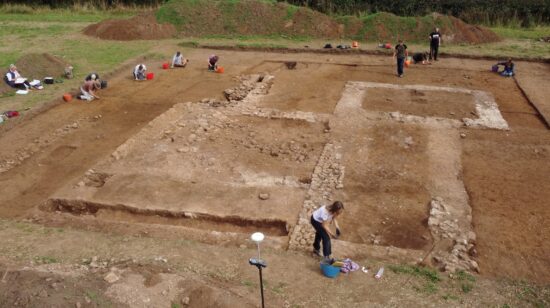
DigVentures has been helping St Mary’s Parish Church in Barnard Castle to bring some of the building’s history to life, ahead of some major restoration work.
This month, Ruth and Jonathan Cooke, who are restoring some of the church’s Victorian windows, took us on a tour and showed us how they’re made….
Step 1. Design your window
Every stained glass window starts with a watercolour drawing. To begin, you’ll need to draw out what your window will look like, and then create a full size version, called a cartoon, that is exactly the same size as the final window. Black lines show where the leadwork is going to go.
Fun fact: The little watercolour drawing was called a ‘vidimus’ meaning in Latin ‘We have seen”. Acceptance of the drawing in the Middle Ages was a form of contract between the donor of the window – the customer – and the artist.
It takes several weeks to create a design, and there was a time in history, when cartoons where reused on an almost industrial scale by some of the major studios. That’s why you’ll sometimes see parts of the same designs in different panels! Saints will just get different colour clothes, and maybe another detail and suddenly Saint Peter is Saint John in another window in another church!
Step 2. Choose the colours and texture of your glass
The stained glass maker buys coloured glass from the glass blower or manufacturer, and the colours are already in the sheets of glass. The most expensive colour for glass is red, which is made by adding copper or gold into the mix. If windows have high proportion of red, you know that someone probably spent lot of money on them! To create other colours, it’s just a matter of adding different metals, for example cobalt for blue. Even the clear glass isn’t really colourless, but has different tinges – it’ll always have a slight green or yellow tint. Imperfections in the glass mix help create colour and texture; sometimes deliberate.
Fun fact: The glass making firm of Hartley Wood on Tyneside put potatoes into the kiln when making glass. The potatoes released moisture as they heated up creating texture and sparkle in their ‘seedy’ glasses. The glass bubbles, called ‘seeds’, make your window sparkle when light shines through it.
Step 3. Visit your glassmaker
There are two main ways of making glass (not including how the Romans did it). One way was to spin a circle of glass, called ‘crown glass’. Later, it became more common to create a cylinder, which the glass maker would then cut through and flatten to a sheet. By the late nineteenth century with the aid of machinery, industrial makers could create cylinders up to 30 feet long.
Step 4: Cut the glass to shape
Today, we use a glass cutter and then… just break it! You need about as much strength as you would need to break a Cadbury chocolate bar that was in the fridge.
Diamonds have also been used to cut glass, but medieval stained glass window makers would simply run a red hot poker over the glass, and then snap it along the lines to get the rough shape. To get the fine shape, the artist would use a toothed piece of iron and ‘nibble’ or ‘groze’ the glass to obtain intricate shapes.
Step 5: Paint your glass
Now that after snapping and snipping, you have your shapes, it’s time to start the fun… paint them with glass paint made from very finely ground up coloured glass. The paint mix formula has hardly changed since the 12th century, and consists of a powder of glass and iron copper oxides being mixed with water, oil or vinegar.
Fun Fact: In medieval times, urine was sometimes used instead of water, as the latter could contain impurities and solid particles which could cause damage in the firing process.
Step 6: Fire your glass
After painting the glass, it goes into a kiln and will be fired up to 630’C, with the exact temperature depending on the colour. The top layer of the glass and the colour both melt, and fuse together.
Fun fact: In order to get halos or blond hair, the back of the glass can be painted with silver stain (silver nitrate). The glass is then fired at a lower temperature and when the carrier is washed off, the silver has migrated into the glass, and you are left with clear yellow. Although the Romans knew about it, the technique was only discovered in the 14th century, so you know that any stained glass window with yellow, must have been made after that.
Step 7. Put your pieces into place
Once fired, you can start fitting your pieces together at a glazing table using lead strips or ‘cames’ which look in section like a capital H on its side. The glass goes into both sides of the lead, which can bend into different shapes. Every time you bend the lead around the glass, you need to ‘dress’ it to fit neatly, using a special tool called a lathekin.
If you want very tight shapes, you need to use a stopping knife – a knife without a sharp edge, just completely smooth. Use little horse shoe nails to keep the lead in place on the table. Where two pieces of lead meet they need to be soldered together. And copper ties have to be soldered to the lead. These are wrapped around the glazing bars in the window to hold the panels in place.
Fun fact: You can’t buy stopping knives. Traditionally, apprentices had to make many of their own tools. Today, some glaziers use oyster knives.
Step 8. Fill in the gaps
Any gaps between the glass and the lead will let in the wind and rain, so you need to waterproof the window with a grout-like material with the consistency of black yoghurt. Rub it in between the lead and the glass to fill the gap between them and let it dry.
Step 9. Fit your window
Hidden in the stone work, there’ll be a groove for the window to slide into. Copper wires are used to keep the windows in place and keep them from collapsing. Fitting the windows can need several people per panel, and each average church window panel can weigh between 15 – 25 kilos. One window will be made of several panels and if you’re thinking about using mechanical lifters – don’t! The panels need to be carried and lifted very carefully by human effort.
Making a stained glass window is very labour intensive and require the coming together of many skills – practical and artistic. If you want to give a go at home, here’s a version we tried earlier…
The ‘try it at home’ version:

Did you know you can make your own EDIBLE stained glass windows? Make the outline of your window design from cookie dough or pastry. Then crush some hard boiled sweets. Place the sweetie dust in the gaps. Pop in the oven at 190C (Gas mark 5) for about 10 minutes – until the sweetie dust melts, and the cookie dough begins to turn golden. Remove from the oven, let cool until the candy glass solidifies… and there you go!
Archaeology in your inbox?!
Want to join a dig? Learn more about archaeology? Join our email list for a monthly digest of our most popular stories, plus alerts for any digs, events, or courses you can join.
Join the list
Written by Johanna Ungemach
Johanna is DigVentures' Community Archaeologist. She runs the Finds Lab, and likes exploring, traveling and telling ghost stories.


Comments (5)
I really enjoyed this article and may even attempt to try the edible stained glass windows
I really enjoyed this article and may even try the edible stained glass windows 🙂
Oh please do let us know if you do!
I love stained glass windows. I go to a glass school in Boston, MA. where they make them.You have to be very precise in your measurements. I like the cookie recipe at the end. That I could do. They still use urine to make dyes though for clothing it’s called urea so people don’t freak out about it and it’s animal urine not people’s.I really enjoyed your article– I’m saving it to read again. Peace Stay well and Happy Easter.
I really enjoyed your article on stained glass. I go to a glass school here in Boston, MA that makes stained glass. You have to be really really precise in your measurements when you do stained glass. Also people still use urine to making clothing dyes. It’s called
“Urea” so people don’t freak out about it and it’s animal urine not people’s. Saving your article. Thank you for the cookie recipe too. Please stay safe stay well everybody. Happy Easter.